

Deploying changes between Salesforce environments isn’t complicated because the tools are bad — it’s complicated because our approach is often inconsistent. That’s why Salesforce deployment best practices matter.
Some components move without issue. Others don’t. Change sets don’t always catch everything, and you won’t always get clear feedback when something’s missing.
By the time you realize something broke, it’s already been pushed to production.
Today, I’m covering what works, what doesn’t, and what to look out for when using Salesforce change sets — based on real-world deployment work as a Salesforce Admin.
If your deployment process still feels manual and unpredictable, I hope these tips help.
Let One of our Experts Audit Your Salesforce
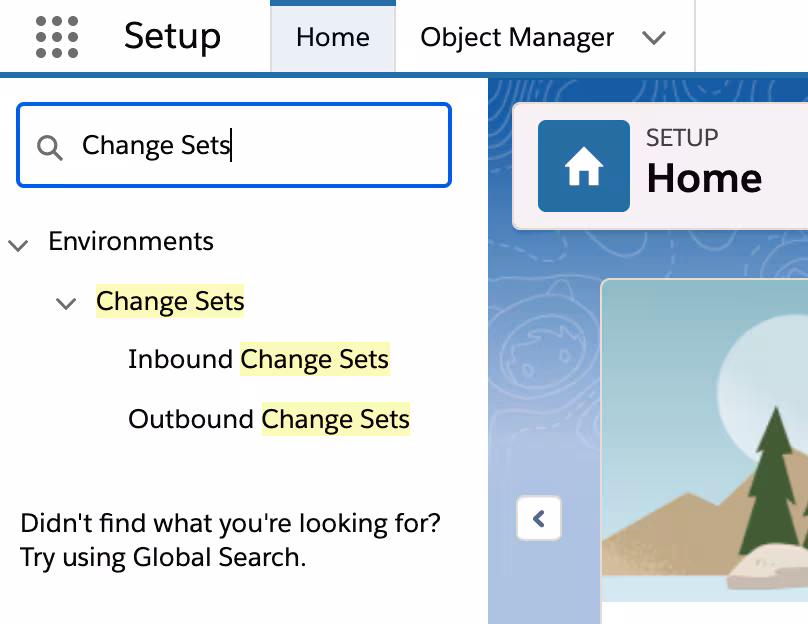
Outbound Change Sets Useful — Until They’re Not
Change sets are fine — in theory.
Salesforce outbound change sets are the built-in option for deploying metadata between orgs.. Easy to access, no external tooling required, and for most basic configuration changes, they get the job done.
But Salesforce deployment best practices require more than “fine.”
There’s no validation step before upload. You don’t know what’s missing until the change set is already locked. And once it’s uploaded, you can’t edit it. That’s where admins usually get stuck — not because the tools are broken, but because they don’t give you much feedback until it’s too late.
The experience gets even more unreliable when you’re dealing with Salesforce Communities.
The metadata structure is more complex and not fully supported by change sets. Some parts — like flows, objects, or Apex — will move just fine. Others won’t. Site.com files, for example, are a core part of the Community experience, but they have to be handled manually. No change set will include them.
I don’t expect change sets to cover everything. But I do expect predictability. That’s what they lack. And that’s why I treat change sets as just one part of the process — not the whole thing.
Why Your Change Set Might Not Run Any Checks
Change sets don’t automatically run Apex tests or validations unless you explicitly select them during deployment. If your “check on push” isn’t triggering, make sure you choose test classes before deployment. Unlike CI/CD tools, change sets don’t include pre-deploy validation steps or post-deploy automation — everything has to be manually specified.
Salesforce Deployment Best Practices
Start With the Right Sandbox Setup
Most deployment issues I run into can be traced back to sandbox hygiene.
Salesforce Deployment Best Practices are not about tools — they about how sandboxes are configured, connected, and maintained. A clean sandbox strategy makes deployments smoother. A sloppy one adds friction you don’t see until you’re halfway through a release.
1. Tiered Pipeline to Deploy Community from Sandbox to Production
Dev sandboxes should push to Partial or Full sandboxes — not directly to Production.
If you’re working across teams or supporting multiple environments, your sandboxes should follow a structured path: Build in a Dev sandbox. Test in a Partial or Full. Then push to Production.
Dev → Partial → Full → Prod.
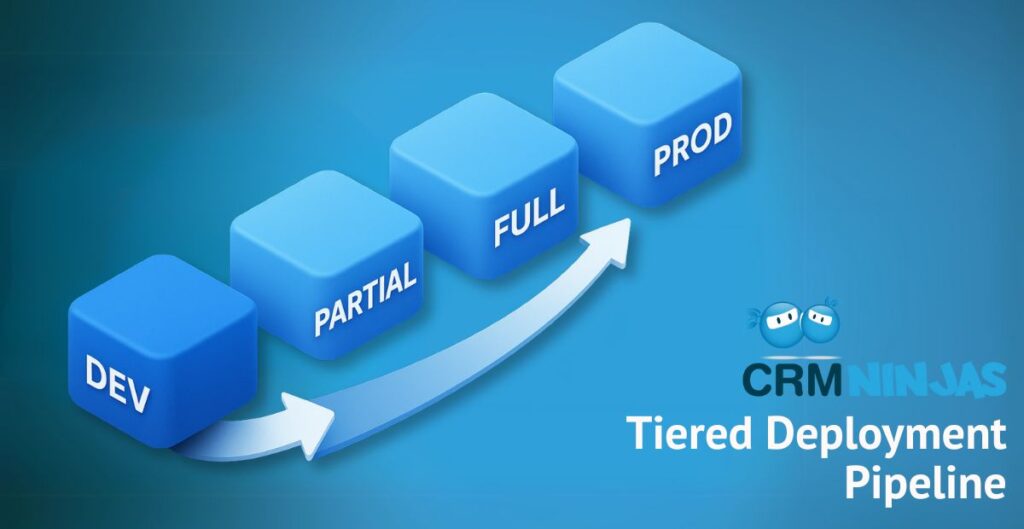
That gives you a real environment for staging and validation, especially when testing more complex changes or deploying communities from sandbox to production. It also gives your team space to do proper UAT (User Acceptance Testing) or peer review before anything hits a live org.
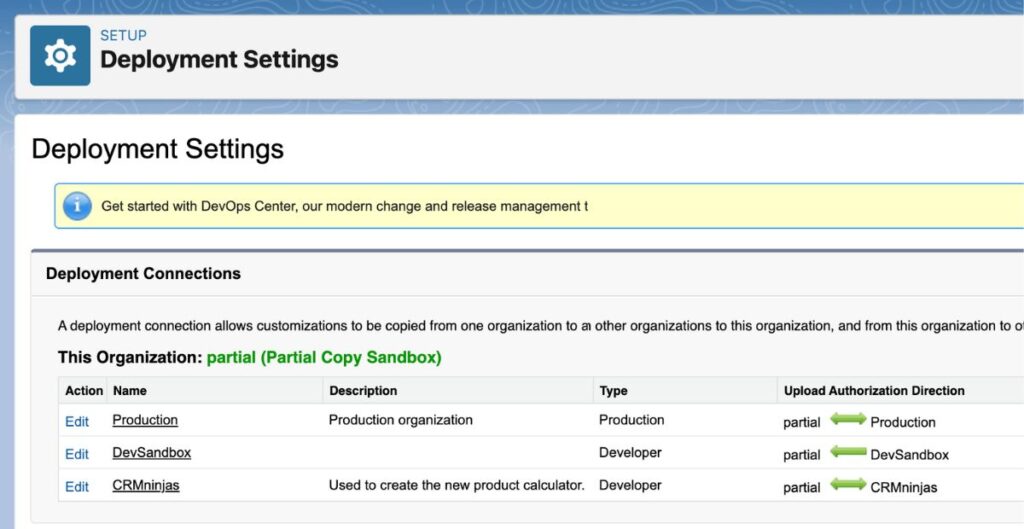
2. Connect Your Orgs Before You Need Them
You can’t deploy a change set between sandboxes or to Production unless the orgs are connected.
It’s easy to skip this when spinning up a new sandbox, but it creates avoidable friction later.
Set connections up early — and make sure they’re configured in the right direction (one-way or bi-directional), based on your workflow.
3. Refresh and Compare Sandbox and Production
Before you deploy, it’s smart to compare your sandbox and production environments.
If a sandbox is months out of sync, you’re testing against an environment that no longer matches Production.
This can lead to broken flows, invalid references, or missed components in your change sets.
Refreshing your sandboxes on a regular schedule — especially Partial and Full — is an easy win that helps keep deployments clean and predictable.
Building a Change Set You Can Trust
Change sets seem simple — until you deploy one and realize it’s missing half the work.
A change set is only as good as what you put in it. And most of the issues I’ve seen in real applications come down to missed components, skipped profile updates, or broken dependencies. Here 3 Salesforce deployment best practices for building change sets.
1. Don’t Forget Profiles
This one causes more headaches than it should.
Admins often push functional changes but forget to include updated profiles or permission sets. That means the feature works — but not for the people who are supposed to use it. Or worse, it works for everyone when it shouldn’t.
Always check: Did the flow, object, or tab you added come with a corresponding permission update?
If yes, include those profiles in the change set. Salesforce doesn’t remind you.
Read our blog: Salesforce Data Security Best Practices in 2025
2. Use the Dependency Tool — But Don’t Trust It Blindly
Salesforce gives you a “View/Add Dependencies” tool when you’re building a change set.
It’s helpful — and you should use it — but it’s far from perfect.
The tool doesn’t always catch indirect dependencies.
For example, a flow might reference a record type that depends on a picklist that’s tied to a field that’s not in your change set. If any part of that chain is missing, your deployment fails or breaks something silently.
This is where a little manual cross-checking pays off. Review your changes as a group, not just as isolated components.
3. Hard-Coded IDs Will Break You
If you’re hard-coding IDs — especially record type IDs or user IDs — your flows and processes will almost definitely fail when moved to Production.
The IDs in your sandbox aren’t the same as the ones in Production. You might not see the issue until a flow throws an error post-deployment. And then you’re stuck fixing it live.
Use a Get Records element to look up a record type ID and filter by name or developer name.
It’s more work upfront, but it saves you from production breakage later.
Know Your Salesforce Sandbox Types
Not all sandboxes are created equal — and using the wrong one can create problems you won’t see until it’s too late. That’s why our final item for Salesforce deployment best practices is simply know you sandbox types.
Here’s a quick breakdown of the main Salesforce sandbox types, and when to use each:
- Developer Sandbox
Good for isolated development and testing logic like flows or Apex. No production data. Fast refresh time. - Developer Pro
Same use case as Developer, but with more storage. Helpful when working on larger projects with more components. - Partial Copy Sandbox
Includes a subset of production data, plus selected metadata. Best for realistic testing scenarios — especially when you’re working with flows, record types, or automation tied to actual user data. - Full Sandbox
A complete mirror of production, including data, users, and metadata. Ideal for staging, UAT, and any final validation before deploying to Production.
If you’re working across teams, testing user-specific features, or deploying customer-facing changes, Partial and Full sandboxes offer the closest representation of how things will behave in the real world.
Choosing the right type of sandbox — and refreshing it regularly — is a core Salesforce deployment best practice.

Get a Free Salesforce Health Check
Deployments don’t have to be risky.
CRMNinjas will review your sandbox setup, advise updates for change sets to meet Salesforce deployment best practices, audit org connections — and flag what could break before it does.
Get clear, direct next steps to clean up your process. Schedule a Free Salesforce Health Check today.
FAQ: Salesforce Deployment Best Practices
Use a sandbox pipeline (Dev → Partial → Full → Prod), validate changes, avoid hard-coded IDs, include profiles and dependencies, and refresh sandboxes regularly.
They don’t support all metadata types, can’t be edited after upload, lack validation steps, and don’t include data or automatic dependency checks.
– Only move metadata (not data)
– Require connected Salesforce orgs
– No built-in version control or rollback
– Outbound change sets: Created in the source org
– Inbound change sets: Received by the target org
No. Change sets only deploy metadata. Use Data Loader or ETL tools to move records.
Partially. Some metadata (like flows or Apex) moves fine, but Site.com files and other assets must be deployed manually.
Compare sandbox and production, stage changes in Partial/Full sandboxes, include profiles, use the dependency tool, and never hard-code record IDs.
– Developer/Dev Pro: Isolated builds
– Partial Copy: Testing with sample data
– Full: Pre-production staging and UAT
Yes. Set up deployment connections in Setup before using change sets.
Record IDs differ by org. Use “Get Records” with filters to reference IDs dynamically.